Image filtering is one of the most basic utility of image processing and computer vision. Any image processing application, like feature detection, is composed of applying a series of filters to the image. After reading this guide, you’ll be able to efficiently apply filters to images using shared memory of CUDA architecture. Here’s a step by step guide to write your own filter of any type and size. For simplicity I’ll use a 16 bit unsigned grey scale image in this tutorial.
The first step is to load all image data from global memory to shared memory and pad shared memory according to the filter size. What I do below may seem expensive to you, but all what I’m doing is copy data into shared memory. The real expensive computation (applying filter mask) will then be done in shared memory.
Padding In Shared Memory:
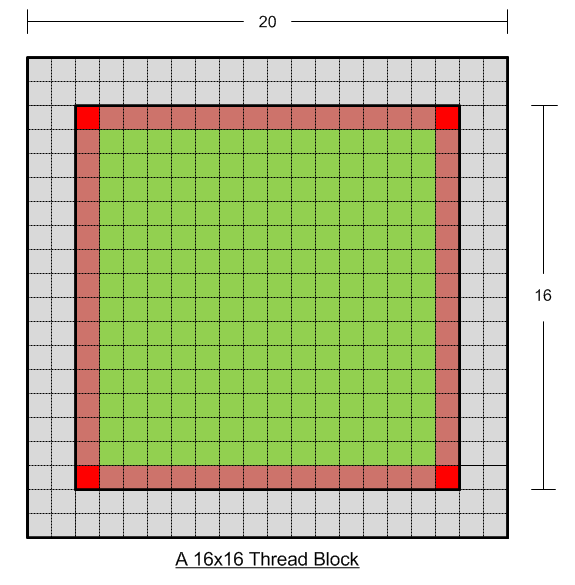
The trick is to create shared memory bigger than the actual block size. For example if your thread block is 16×16 and filter size is 5×5, you need to add two rows/columns on each size of the shared memory, i.e. the shared memory size per block in this case will be 20×20. The Internal 16×16 portion of the shared memory is filled with the corresponding image pixel from global memory, while the boundaries are padded with the adjacent image values (not a dummy value like 0). Here’s an example:
#define BLOCK_DIM 16
__global__ void imageFilter5x5 (unsigned short* inputImage, unsigned short* outputImage, unsigned int imageWidth, unsigned int imageHeight){
unsigned int xIndex = blockIdx.x * BLOCK_DIM + threadIdx.x;

unsigned int yIndex = blockIdx.y * BLOCK_DIM + threadIdx.y;

unsigned int Idx = yIndex*imageWidth + xIndex;
/*Losing 2 boundary Pixels of original Image. Filtering Will start from the Second Element of Second Row*/

if(xIndex<2 || xIndex>=imageWidth-2 || yIndex<2 || yIndex>=imageHeight-2)

return;
/*For this Example, we are assuming BLOCK_DIM = 16 and padding of two rows/columns on each boundary*/

__shared__ float shMem[BLOCK_DIM+4][BLOCK_DIM+4];
/*Translating Local Block (16x16) index into shared memory (20x20) Internal Filling Index*/

unsigned int shY = threadIdx.y + 2;

unsigned int shX = threadIdx.x + 2;
Filling Shared Memory
Every thread in a thread block will copy one pixel from global index into translated shared index with the exception of the boundaries. The four boundary threads of a 16×16 block (64 threads) will also pad the extra image pixels along with their own pixel. Keep this golden rule in mind; Smaller Block size means more overall padding effort per image, so you may want to keep the block size as big as your architecture supports to minimize padding (extra) effort for the GPU. If you are coding for a graphics card that can support 1024 threads per block, go for 32×32 block size.
/*Only The boundary threads of Thread-Block will do extra effort of padding*/

if (threadIdx.x==0 || threadIdx.x==BLOCK_DIM-1 || threadIdx.y==0 || threadIdx.y==BLOCK_DIM-1){
// pad
}
else

/*Threads Inside the boundary*/
shMem[shY][shX] = inputImage[Idx];
__syncthreads();
This code is really in-expensive as the maximum effort put by any thread is copy only 8 pixels from global to shared memory (four corners of 16×16 block). Other threads copy 1 pixel and the boundary threads (except the corners) copy three pixels. Once the data is in shared memory you can apply the filter there to achieve maximum performance. Here’s a pictorial representation of the shared memory along with padding:
The grey region is the padded region while green and red area is unique to every thread block. The filter mask will be applied on the inner 16×16 block, while the grey region of shared memory serves as padding.
Why not Pad with zeros and Make life easy
Keep in mind that a thread block is not a full image, it’s a very very small chunk of the original image. The thread block may lie at the boundary of the image or may lie in the center of the image. If you pad the shared memory with zero (i.e. initialize it to zero and just copy the inner 16×16 pixels from global) that will mean that you are replacing zeros with actual image values. Hence the padding has to be of adjacent pixels from the original image.
Once the data is in shared, you can apply any filter, here’s an example of a 5×5 averaging filter:
float outputPixel=0.0;
for (i=-2; i<=2; i++)
for (j=-2; j<=2; j++)
outputPixel += 0.04 * shMem[shY+i][shX+j];
outputImage[Idx] = outputPixel ;
We'll be releasing CUVI v0.5 with many new features including Filters and Feature Trackers. Keep and eye on our website.
